How to deploy a Flask app to production
Why use Docker?
TLDR - Agility, Portability and Isolation

You should use a technology only if it fits your use case and not because everybody is talking about it on Twitter. The main purpose of using Docker is efficiency. It would suck if one computer could do only one thing. Although we can run multiple programs simultaneously, we need to ensure that they don't interfere with each other i.e. we need isolation. It also might happen that different software requires different versions of the same dependency. So people invented Virtual Machines! But virtual machines set up a whole new virtual computer, ensuring complete isolation but introducing significant overhead too. Containers on the other hand share the kernel within the host OS.
Let's build the stack
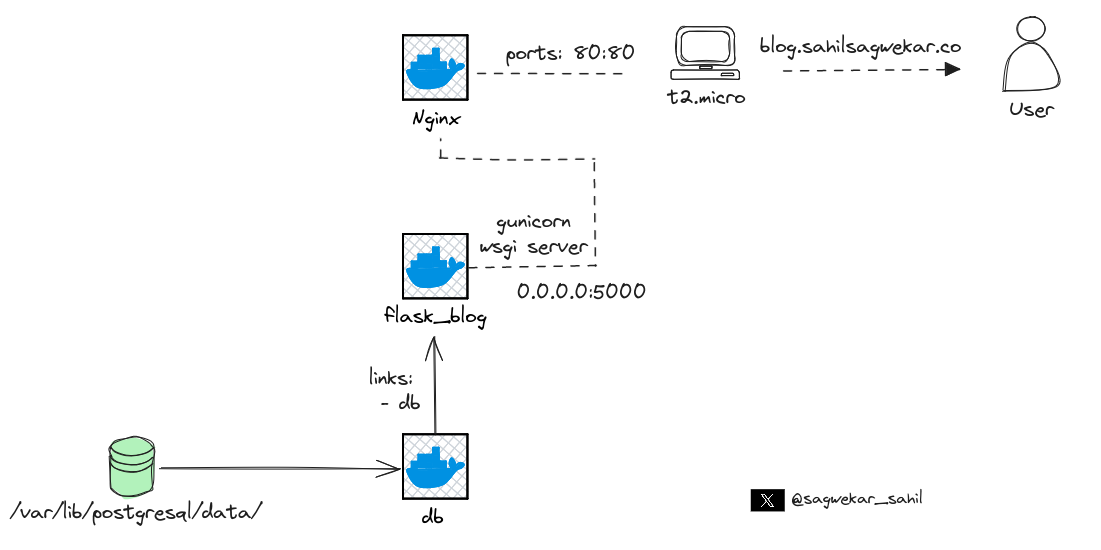
We will be using 3 containers in our stack. Nginx as reverse-proxy, the flask app in the second container and the database running in the third container.
-
The Flask container
FROM python:3.11.6-slim-bullseye

WORKDIR ~/flask_blog

COPY . .
RUN pip3 install -r requirements.txt
RUN apt-get update && apt-get install -y curl

CMD ["gunicorn", "--bind", "0.0.0.0:5000", "wsgi:app"]
-
The
FROMdirective (that's what they are called) specifies the base image that we will be using. We will use thepython 3.11image which comes with python 3.11 pre-installed. -
The
WORKDIRdirective creates and specifies the working directory for all the next commands in the Dockerfile. -
COPYdirective copies the contents of the current directory on the host OS and copies it inside our working directory i.e.~/flask_bloginside the container.
The current directory looks like this -
.
├── Dockerfile
├── forms.py
├── main.py
├── requirements.txt
├── static
├── templates
└── wsgi.py
-
The
RUNdirectives run commands which commit their changes onto the container image i.e. installing the dependencies updating the apt repository and installing curl. -
CMDdirective is the command the container executes by default when you launch the built image, the command isgunicorn --bind 0.0.0.0:5000 wsgi:app. We'll talk more about gunicorn and wsgi later in the article. -
Docker compose file
services:
  nginx:
    depends_on:
      - flask_blog
    image: nginx:stable
    restart: always
    links:
        - flask_blog
    ports:
      - 80:80
    volumes:
      - ./nginx/:/etc/nginx/conf.d/:ro

  db:
    image: postgres:12-bullseye
    env_file:
      - .env
    volumes:
      - postgres_data:/var/lib/postgresql/data/
    healthcheck:
      test: ["CMD-SHELL", "pg_isready -d $${POSTGRES_DB} -U $${POSTGRES_USER}"]
      interval: 1s
      timeout: 3s
      retries: 10

  flask_blog:
    image: sahilsagwekar2652/personal-blog-website:master
    depends_on:
      db:
        condition: service_started
    env_file:
      - .env
    environment:
      DATABASE_URL: db
    links:
      - db
    healthcheck:
      test: ["CMD", "curl", "--fail", "http://localhost:5000"]
      interval: 30s
      timeout: 10s
      retries: 5
    restart: on-failure

volumes:
  postgres_data:
    name: "db_volume"
I won't be going through every section of the docker-compose file. If you would like to understand what's happening in detail, go through the official docker compose reference.
-
Persisting data
If we start a container ad-hoc, it creates an untagged volume. In our context, we need to persist the data from the database container. So even if we bring the stack down using docker compose down , make some changes and then bring the stack up once again using docker compose up no data would be lost.
The key takeaway from the docker-compose file is the volumes section at the end. Here we define a volume postgres_data . This volume is mapped to /var/lib/postgresql/data inside the db container.
About WSGI
WSGI stands for Web Server Gateway Interface. WSGI is nothing but a protocol to communicate between the HTTP server and the python backend application. Think of it as a middleman between the HTTP server and the python backend. The WSGI protocol is described in the PEP 3333 standard.
One of the reasons why WSGI exists is to decouple the application from the webserver and to make it more platform agnostic. If you have worked with Flask or Django you might recall that both frameworks come packaged with a built-in HTTP server. However when we run these servers the output strictly warns us against using these built-in servers in production. The reason is that these servers miss quite a few features that other web servers provide, one of which is support for TLS certificates (HTTPS).
For production, there are many WSGI servers to choose from. In this project we will be using Gunicorn. You could tell that from the last line in the Flask blog Dockerfile.
More about WSGI in this Reddit post - https://www.reddit.com/r/django/comments/skge94/uwsgi_wsgi_gunicorn_apache_nginx_could_someone/
-
Setting up NGINX webserver
Now that we the flask container ready, we need to set up a webserver container to handle all the HTTP requests. For simplicity, a reverse-proxy also does the same thing but can do a lot more. NGINX is also used a reverse-proxy server.
    volumes:
      - ./nginx/:/etc/nginx/conf.d/:ro
In the volumes section inside the nginx service in the docker-compose file, we have a volume mapping from the nginx directory in the host OS to the /etc/nginx/conf.d/ directory in the container. The ro specifies the read-only nature of the connection.
The contents of the nginx directory should look like this -
nginx/
└── nginx.conf
Configuring nginx is relatively simple for our context. Following is the nginx.conf that we will be using -
upstream flask_blog {
    server flask_blog:5000;
}

server {
    listen 80;

    location / {
        proxy_pass http://flask_blog;
        proxy_set_header X-Forwarded-For $proxy_add_x_forwarded_for;
        proxy_set_header Host $host;
        proxy_redirect off;
    }
}
Source - https://testdriven.io/blog/dockerizing-flask-with-postgres-gunicorn-and-nginx/#gunicorn
We are DONE!
Our blog is now ready to deploy! Run it on your local machine or on a Cloud instance.
References -
https://chat.openai.com/share/27e0b18d-cc23-4925-acc5-7966916d04e4